pasco is not designed to meet all and every communication aid users needs. Its fundamentally designed to suit early switch scanning users who also need auditory cues. Despite this it can be used in a range of ways. Find the relevant section below for some help and some common tips. This is a short help file - for a longer more detailed range of support look at https://docs.acecentre.org.uk/pasco/.
Getting Started with pasco
Quick Reference
Settings
There are a range of settings for pasco. Each setting and a description of what they mean can be found below
- Access
- Helpers
- Speech
- Appearance
- Vocabulary
Access
On-Screen Navigation
Enable or disable the 4-way navigation tool. Remember - you can reposition this just by dragging it - and resize it by pressing and holding on the tool - then dragging one of the corners. Have a watch of this video to see how it works.
Access Mode
There are currently three options;
- 1 switch - Auto-Scan
- 2+ switches
- Wheel (NB: Experimental!)
Switch Setup - Background
Switch access works by mapping keyboard keys to different actions. A box which allows one or several switches to be plugged in and then connect to the device is then needed. Be aware that for pasco we are looking at switch boxes that support keyboard presses without any additional software. Some (such as the JoyCable and the Crick USB switch box) emulate a joystick button which won't work. Also switch boxes such as the Hook+ won't work either unless you follow our guide on how to use iOS switch scanning with pasco. The following currently work with pasco on iOS:
2+ Switches (Default)
By default switch access is set to Manual - which would allow someone to use the on-screen navigation tool - or use 4 switches to navigate the currently active language tree. For example the arrow keys - up, down, left & right - would allow someone to access the tree. Equally, the keys a (left), s (down), d (right), w (up) can be used. Lastly the keys 1 and 2 would allow a user to go left and right in the tree.
1 switch - Auto-Scan
Automatic scanning, often called "1 switch scanning" allows a user with one switch to navigate pasco. The computer moves through each item so the user doesn't have to - and only selects the one they want when ready.
Be aware - you need to select which switch key selects (moves forward) - which you can do in the option "Switch key to select items". There are then some options you can configure:
Loops (Default: 3)
The number of times the automatic scan runs through each level of the tree before stopping.
Delay at first item (ms) (Default: 1000 ms)
It is sometimes useful to have a delay at the first item in each level of the branch to help someone to time their switch press.
Auto-scanning delay (ms) (Default: 3000 ms)
The time the scanner moves from one item to a next automatically. Want it to scan quicker/faster? Move it down. Want it to scan slower? Move it up.
Configure Actions
Switch key to select items
Here you can choose your switches (keys) and what should do what action. Select the action (e.g. in Automatic/1-switch scanning you will need to just select the "Select item" action). Then add your key. Remove any keypresses that you don't want to be used by pressing the red cross.
Minimum Cue Time (ms) (Default: 0 ms)
By turning this on it stops the user selecting a large number of items in the tree before hearing the cue. You can change the default time here.
Ignore second hits (ms) (Default: 100 ms)
This feature stops the switches being responded to if they are hit within this timeframe. So for example, if a user presses a switch and hits immediately afterwards - pasco will ignore this second press if it is within the timeframe. Some
Helpers
We will add additional 'helpers' (actions that alter the tree) here - but for now we only have one helper:
Back option for all branches
It's really useful for single switch scanners to get back a branch if they need to. This adds the option of 'Back' to the end of each Branch, at the beginning of each branch or not at all.
Speech
Cue Voice
The cue voice - often called the private voice is the synthesised voice that is designed for the communication user to hear. Ideally this would be to a headphone or quiet speaker that only the communication aid user can hear.
Choose your voice and the related volume, pitch and rate (speed) of the voice as you wish. Note there is a plus symbol - this allows people who are using more than one language to add a different synthesised voice for that language. Note there is a line on each slider. This defines the default position so you can reset it if you ever slide this by accident.
Main Voice
The main voice - often called the public voice is the synthesised voice that is designed for the communication partner(s) to hear. This is often an amplified speaker.
Choose your voice and the related volume, pitch and rate (speed) of the voice as you wish. Note there is a plus symbol - this allows people who are using more than one language to add a different synthesised voice for that language.
First time run (Cue Voice)
For many people who are visually impaired its useful to 'hear' the items at each selected branch. This is like someone who is using their eyes to visually scan the interface. It give the user a fast way of scanning the items. If you turn this on we recommend making as fast as you can before the voice becomes hard to understand.
Appearance
This area defines how the application looks and feels.
Font size
Adjust the font size of the text shown in pasco
Theme
There are a number of themes - some designed for people with a visual impairment - to aid easier reading of the text
Locale
To change the language of the app (the menus and the configuration text) you can change it here.
TIP
This doesn't automatically change the language of the trees/vocabulary. For that you will have to use something like google translate.
Vocabulary
Active Tree
Allows a user to switch the current active Tree. This means you could have one tree for social chat, another with spelling and another for a particular school or workplace. But more importantly it allows you to switch between a English only tree and a foreign language tree. More information, including how a user can switch without going into the configuration screen can be read here.
Tools
Load an example tree
Pasco has some example vocabularies installed which you can load up. Select the tree, Press "load selected"", then "Save Tree".
Export / Import
Here you can export or import your vocabulary file as a zip file - or a OBF file - to be used in different AAC programmes.
Common Configurations
A Single Switch user
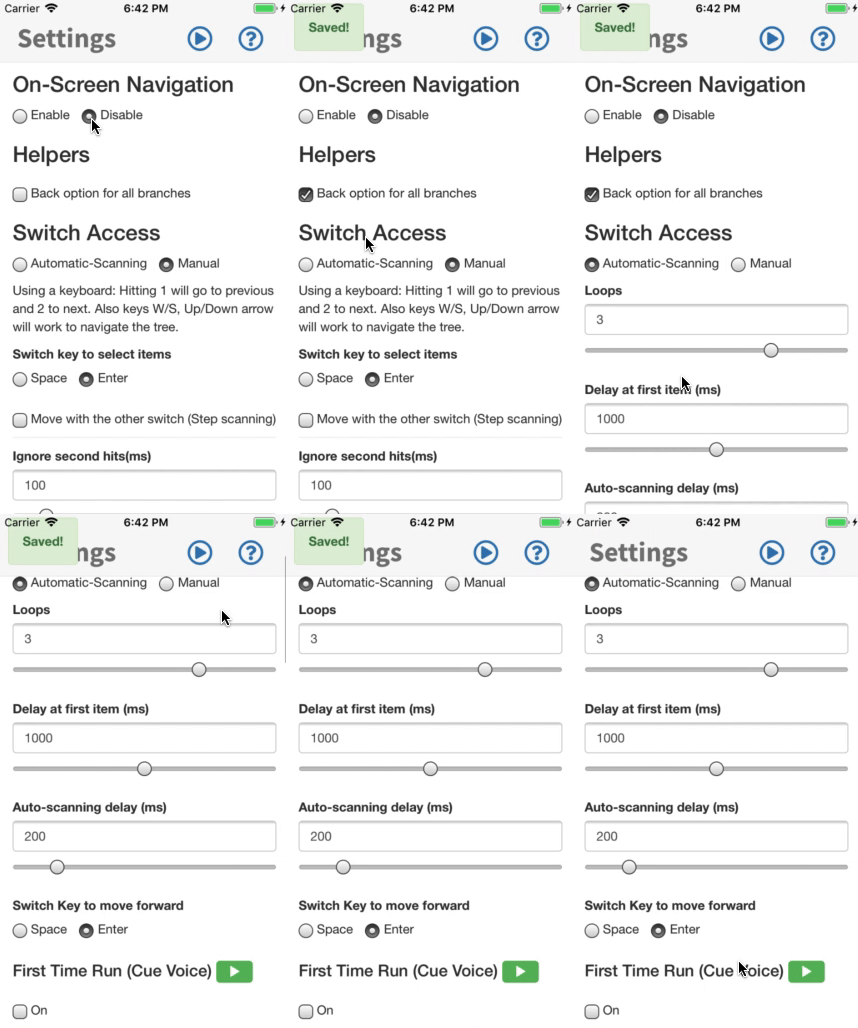
If someone is operating a single button and has learnt the basics of simple automatic scanning then they can use pasco to make their needs known. A video explaining scanning can be found here. To configure pasco for this within the Config Screen change it to "Automatic-Scanning" Under "Switch Access". There are some options available when you do this.
- Loops. This is how many times the scan will go through each level of the tree if no item is selected. It can be useful if the indvidual wants to listen first and then select. However if you are using it for this try and look at the "First time run" Option
- Delay at first item. Sometimes its difficult for people who use auto-scanning to select start the scan AND select the first item. This delay time adds an extra delay to the very first item at each level of the vocabulary
- Auto-scanning delay. This is the time it takes to move from one item to the next. Some people call this the "Scan Time".
- Switch key to select items Many switch boxes (the piece of equipment that connects your switch to the computer) use space or enter as the emulated key press. Which emulated key press are you using? This will be the key that selects items
- First Time Run (Cue Voice) It can be useful to have a cue for the first time the scan goes through each level of your vocabulary. This may go a lot faster than the regular scan rate. This is called the First time Run. By turning this on you can change the rate and a different voice if required
- Ignore second hits(ms) If the user has difficulty pressing the switch once - or for example tremors on a switch - increasing this time can help. It ignores second hits of the switch if they are within the time period selected
- Ignore key presses under n ms This setting tells the app to ignore short switch presses. You can alter this time as you need to.
A Two-Switch user
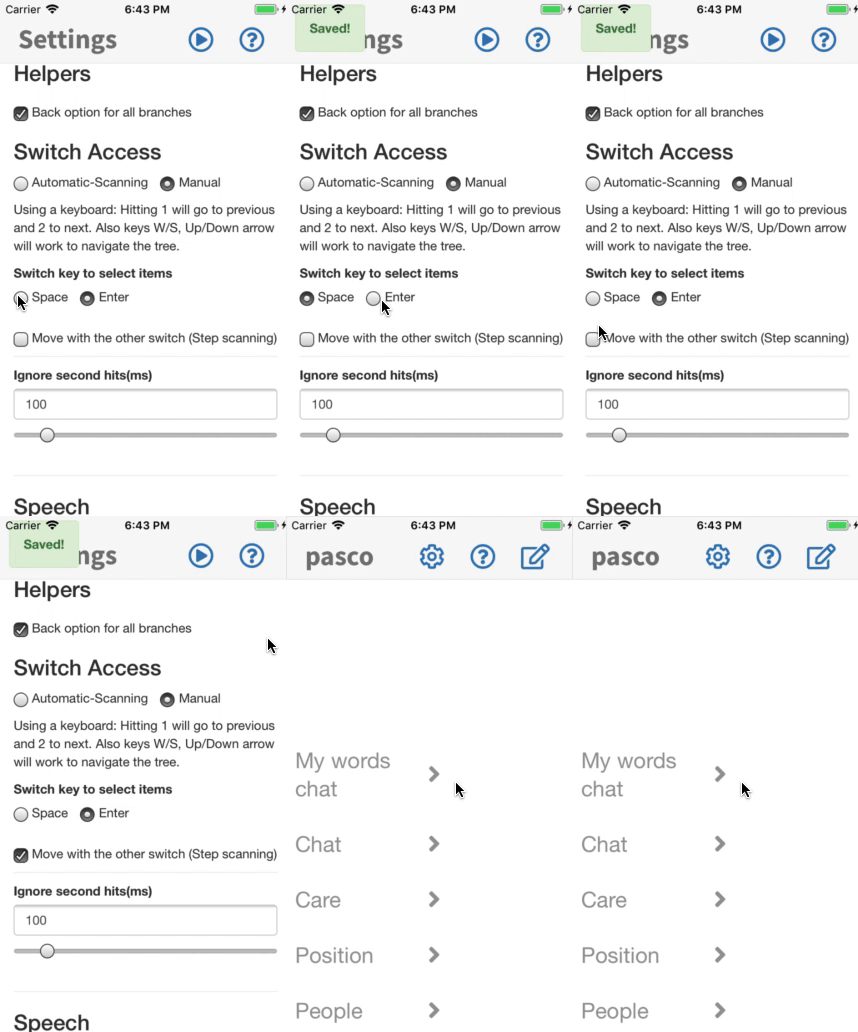
Some people may use two switches. One switch will move through the items - with a second switch selecting them. This is called Two-switch or Manual scanning. To configure pasco for this within the Config Screen change it to "Manual" Under "Switch Access". There are some options available when you do this.
- Switch key to select items Many switch boxes (the piece of equipment that connects your switch to the computer) use space or enter as the emulated key press. Which emulated key press are you using? This will be the key that selects items.
- Move with the other switch (Step scanning)You will need to select this if you are using two switch scanning. What does this button do? Lets imagine you select "Space" as your selection key. Checking this box will make "Enter" your move key. Equally if you have "Enter" as your selection key it makes "Space" the move key.
- First Time Run (Cue Voice) It can be useful to have a cue for the first time the scan goes through each level of your vocabulary. This may go a lot faster than the regular scan rate. This is called the First time Run. By turning this on you can change the rate and a different voice if required
- Ignore second hits(ms) If the user has difficulty pressing the switch once - or for example tremors on a switch - increasing this time can help. It ignores second hits of the switch if they are within the time period selected
- Ignore key presses under n ms This setting tells the app to ignore short switch presses. You can alter this time as you need to.
Someone who controls the up/down keys on a remote control
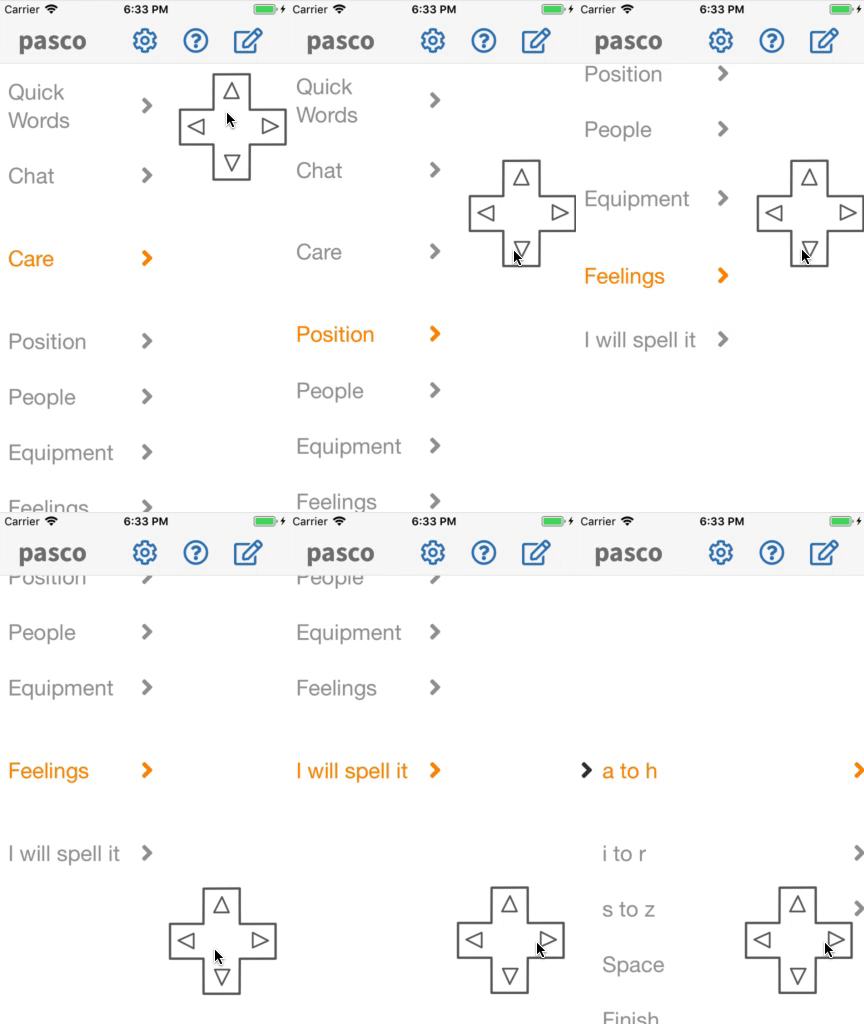
Some individuals can operate one finger or thumb with some dexterity once positioned in the correct place so that they, for example, can control the navigation arrows of a remote control. Pasco has a built in navigation aid that, although designed for a communication partner to use can be useful for the individual. To turn this on Select the "On" option of the "On-screen navigation".
The navigation arrow allows you to go up,down, left and right through the language of your vocabulary
Once on you can press and hold on the 4 way arrow to move the navigation tool around the screen to where you need it - and resize it. To resize it press and hold on the middle of the arrow then grab the edge of the dotted line surrounding it to resize the tool.
Someone who can control the arrow keys of a external (Bluetooth or wired) keyboard
Some individuals can operate an external number pad (like this) - where one or more fingers can operate the arrow keys. This can be placed in the correct place - and mounted if required. To use this, pair with your device (iPhone, iPad or other device using pasco). Make sure your numlock setting is on so you can use the arrow keys. The arrows allows you to go up,down, left and right through the language of your vocabulary
Dual-language requirement
Some people may understand one language but need to communicate to others in a different language. Pasco allows you to do this by changing the voice of the cue (the voice that the pasco user would hear) - and the main voice (the voice that others would hear). There are two ways you can achieve this with pasco
- Using the in-built Text to speech engine - and changing the language
- Recording your own cue/main voice audio recordings
How to setup for auditory cues

pasco is designed to work well with an external headphone or speaker so the person communicating can only hear the cue rather than others in their environment hearing the cue constantly. Please note. This feature is only available on iOS at present. To do this plug in a wired headphone or speaker to the device (it does not work on bluetooth speakers yet!). When you do this all sound, by default, will now be directed to your headphones. To redirect the Main voice to the speaker of the iPhone/iPad you need to check the box to redirect the output in the Config->Speech.
Editing - Quick Mode
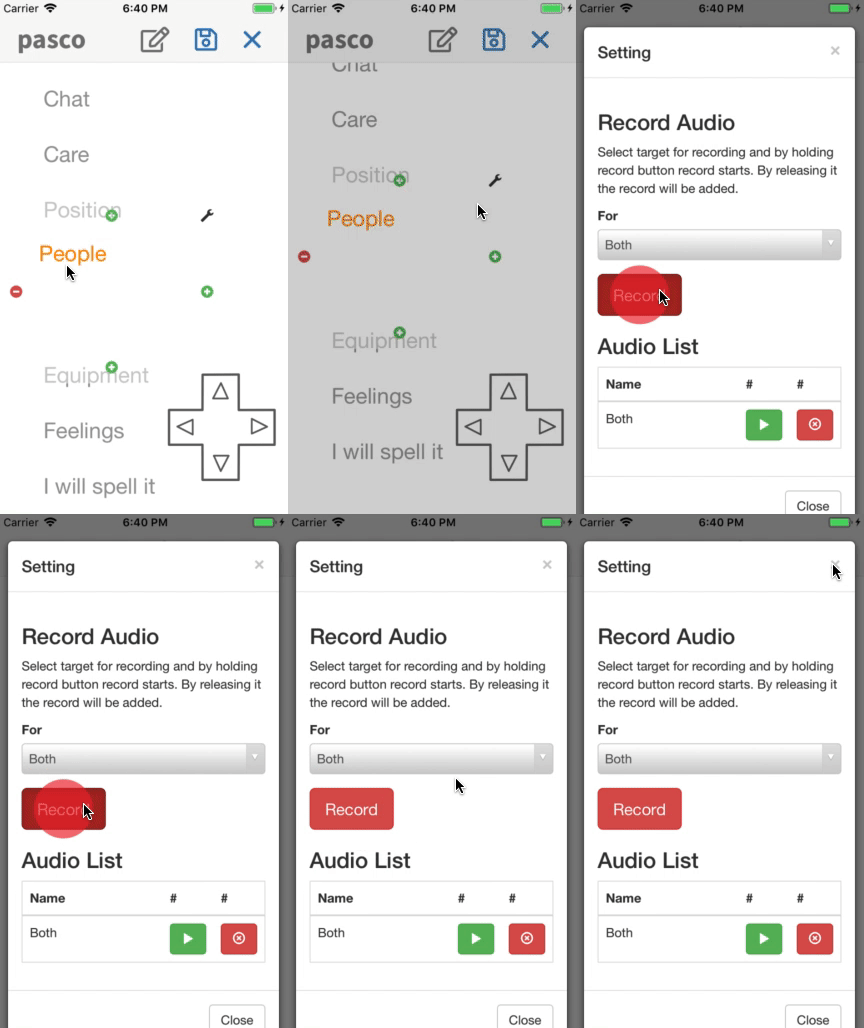
pasco has some simple and advanced editing available. We will first look at the simple - within app way of editing. To Edit within the app navigate to the tree or part of the tree you want to access (hint: enabling the navigation tool helps this) and then hit the Top right Edit icon (looks a little like a pencil and pad). Once in this mode tap on the item you want to edit. A white box will appear with small markers. If you want to edit the text (the label) - just tap in the white area and with the on-screen keyboard edit the text as you wish. If you want to add a new item above or below this item - simply hit the plus symbol either above or below the item If you want to change the recorded cue or main recording - you can do this by tapping on the spanner symbol next to the item you want to change. Then in the next window select which the recording is for (Main, Cue or Both) and press and hold the red "Record" button. Release the button when you are finished recording.
Editing - Advanced Mode
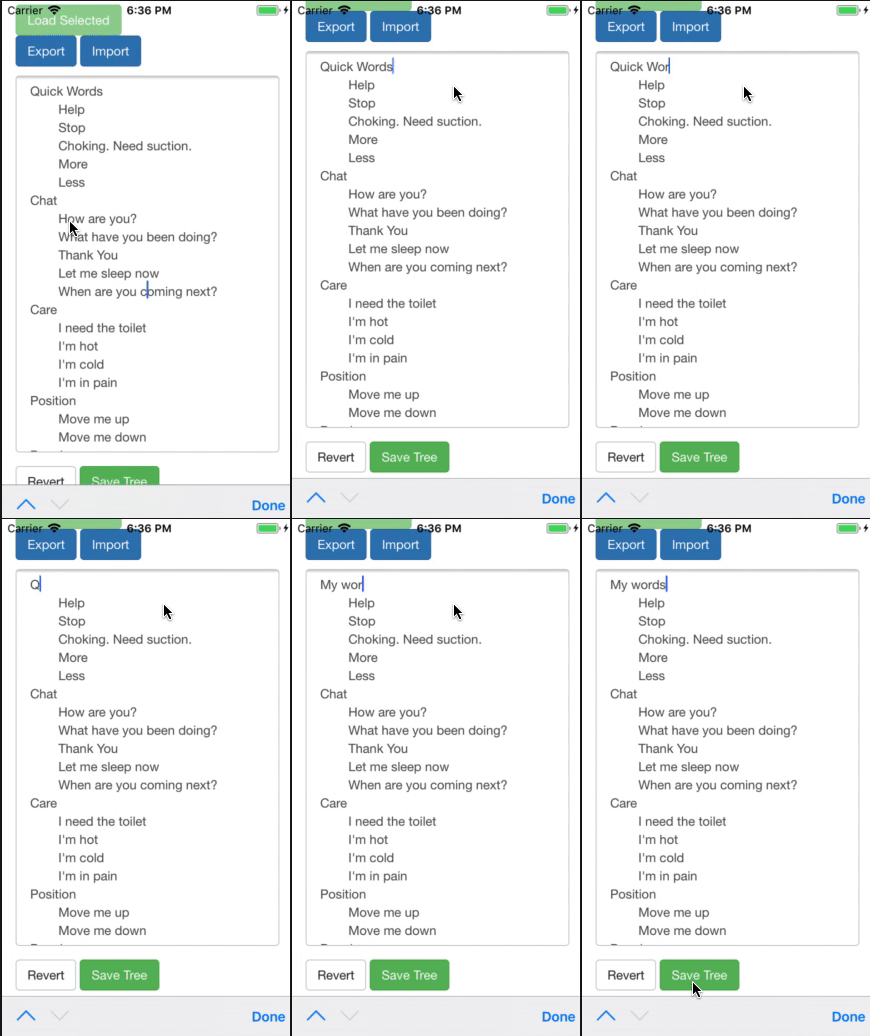
In the config it's possible to import and export your own language tree. This is simply a text file. There are two ways you can make this:
- Within MindNode. A mindmap editor. Create your list then export to Markdown and import this file
- Within a plain text editor (e.g. Notepad). Simply indent lines using the tab key under each heading. You can look at an example here
Importing and Exporting Vocabulary
Backing up and importing is easy. If you have no recordings in your language file you can simply select all of the text in the Config->Tree Section and paste it somewhere safe. Equally copy and paste a file you have been working on to that field - and then save your changes. You can also import a text file if you are on a PC. If you do have recordings make use of the Export and Import Tool. It creates a zip file containing your audio recordings as well as the edited vocabulary file.
Credits
- Inspiration and reason: Clients of the Ace Centre
- Fundraising: Paul Pickford
- Project management, Design and planning: Will Wade
- Coding: Hossein Zoda
- Responsive Voice for Text to Speech (Web), https://responsivevoice.org/ used under the Non-Commercial License
- Fontawesome, http://fontawesome.com